So, you have finally purchased the mirrorless camera that you’ve been dreaming of owning for years! You’re so excited and pumped up that you wanted to immediately go out on a shooting binge.
However, as a beginner and without the basic knowledge of how to use a mirrorless camera, you don’t want to ruin your very buoyant mood and get frustrated if your photographs come out all useless!
In this article, I will discuss how to get you started with your new mirrorless camera and how to properly use it.
I will emphasize the importance of reading and keeping the user’s manual for your benefit!
Beginner’s Guide – Key Points to Remember
These are basic guides and recommendations that are equally important for beginners to take note of!
1. Read Your Mirrorless Camera’s Manual
This is quite ironic but this happens most of the time (if not always) to all of us!
We often ignore and don’t read the instruction manual first, on the presumption that we already knew the product.
And that we can make it work without even checking the manual!
Little did we know that it was the perfect recipe for disaster by doing things backward!
Pay extra attention to the SAFETY PRECAUTIONS! This can only be found in the main Instruction Manual and normally not included in the Quick Guides!
- To Get Started – Read First the Quick Guide
- If you’re bored by just seeing how thick the supplied user manual is, you can first opt to read the quick guide.
- A quick guide normally consists of only a few pages that will tell you how to set up your mirrorless camera.
- Some quick guides even come as a leaflet (just one page).
- What To Do in Case There’s No Suitable Instruction Manual Supplied
- Normally, instruction manuals are provided in different languages (English is the universal language).
- If there’s no supplied manual in your native language you could always go to their official website and check support then search and download your product’s manual.
- Or, download it from the direct link provided in the user’s manual and or quick guide.
- Avoid any mistake that could ruin your new Mirrorless Camera
- You have to remember that you must first read the manual or quick guide carefully before doing anything.
- For such expensive, sophisticated, and complex equipment as the mirrorless camera, it is very important to read the user’s manual/quick guide thoroughly.
- Do not attempt to assemble or set up your mirrorless camera by just allowing your instinct else you will be sorry later.
- Keep a copy of the User’s Manual for future reference
- Always keep a copy of the instruction manuals for your future reference.
- Mirrorless cameras have so many functions that you won’t remember them all reason that you will need the manual as you learn to discover your mirrorless camera more.
2. Setup Your Mirrorless Camera According to Manual
Now that you have gone through reading the User’s Manual and or the Quick Guide…
… you are now ready to set up your mirrorless camera.
Remember, you will still need either of the two for reference and you should only follow the steps provided in the Quick Guide/User Manual.
Initial Preparations:
- Install Neck Strap
- Follow the Quick Guide on how to install the neck strap.
- Different brands have different neck strap designs, therefore only follow what is written in your manual.
- Make sure the neck strap is secured- remember your camera will be hanging around your neck most of the time so ensure that the neck strap is correctly installed and secured lest it falls.
- Install Battery
- First charge the battery (see Quick Guide on how to charge your battery with the accompanying battery charger).
- Insert the charged battery into the battery compartment.
- Take note of the marking for the correct orientation.
- Push the battery until it locks (there’s a hook that will secure the battery).
- Battery will not lock if inserted facing the wrong direction.
- To remove the battery- push the lock to release the battery.
- Install Storage or Memory Card
- Normally memory card slots are inside the battery compartment.
- Check the Quick Guide/Manual for the location of the card slot (note: some mirrorless cameras have two card slots).
- Make sure that the memory card is not locked (note: images cannot be recorded if the card switch is in lock position).

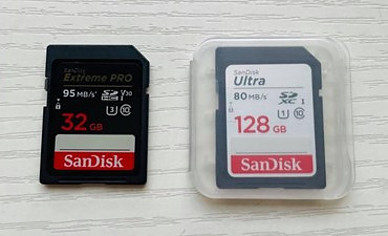
- Check and ensure the correct direction when you insert your memory card (if inserted correctly you should be able to push down and the card will be locked)
- If the memory card is inserted facing the wrong direction it cannot be locked.
- To remove the memory card – push down and release.
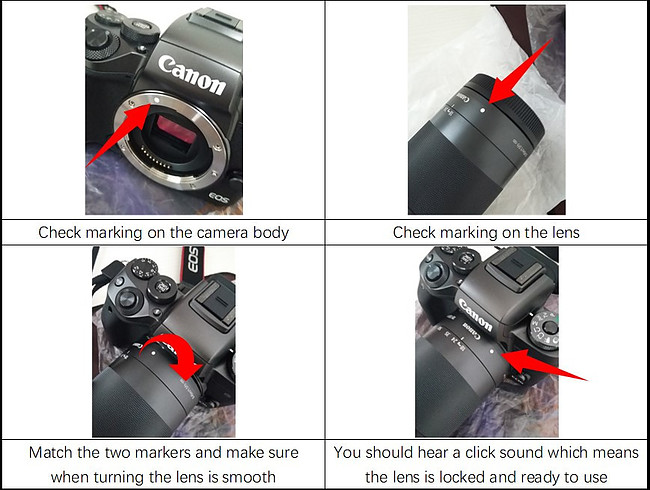
- How To Mount the Lens to the Body of the Camera
- You have to be very cautious with this set up- remember that the camera body and lens both have sensors.
- Sensors are a very delicate and sensitive component of the camera- so you have to be very careful in handling these two main parts of your mirrorless camera.
- When mounting the lens to the body follow the step as described in the Quick Guide or User’s Manual.
- Locate the index marker on the body and also on the lens- match those two markers to integrate the body and lens.
- Rotate the lens to the direction mentioned in the Quick Guide/Manual.
- Don’t force if you feel that it’s difficult or it’s too tight to turn the lens- you might damage the thread.
- When integrating the lens and body it should be smooth. As you rotate, you will hear a click sound- it means that the lens had been locked in place and is good to go.
- Below sample illustration of integrating the lens to the camera body is for EOS M5

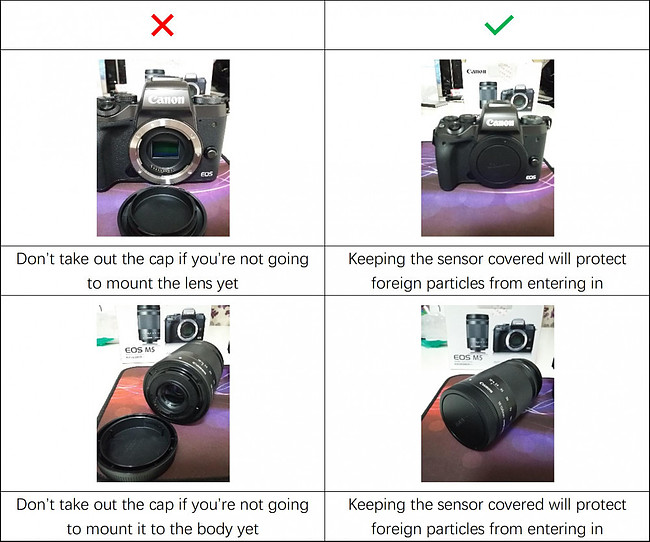
CAUTION: VERY IMPORTANT!
- Do not remove the cap or cover of the sensors on the camera body and the lens if you’re not yet ready to mount it!
- Exposing the sensors open could cause some dust or dirt to enter and could cause serious problems!
- DO NOT TRY TO TOUCH THE SENSORS – THIS SHOULD BE AVOIDED AT ALL COSTS!
- Setup Time and Date
- Locate the power switch and turn ON the power
- Change the Time and Date by the following instruction in the Quick Guide/User Manual.
- Select your Time Zone.
- Power OFF your camera.
3. Play And Familiarize with Your Mirrorless Camera
Now that you have set up your mirrorless camera you are now ready for the next step.
- Still using the aid of the Quick Guide and or User’s Manual – study and familiarize yourself with the controls and dials.
- Locate the power switch- this is the first control that you need to activate for you to use your mirrorless camera!
- Below is a sample illustration of the controls and dials of my own mirrorless camera EOS M5.
- Follow the instructions in the Quick Guide/Manual and take a test shot.
- This is just to ensure that you have mounted your lens correctly.
- If you can capture an image then you are good to go to the next step.
- Please note that some mirrorless cameras may need “calibration”- this feature depends on the brand and model so make sure to check the manual carefully so that you won’t get frustrated why your images are lousy.
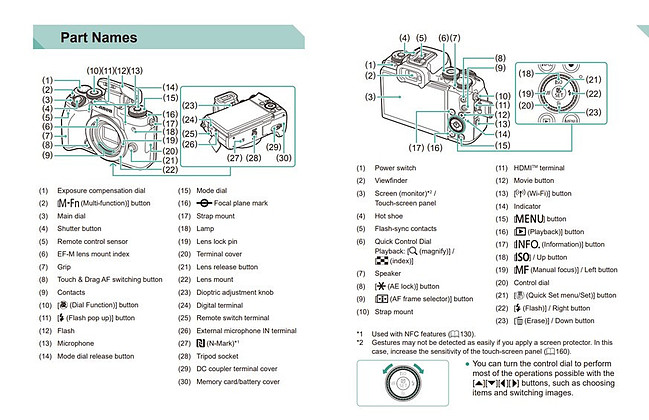
Tip: One important aspect of capturing a good photograph is to get familiarized with all the dials and controls. Study what are the main functions and sub-functions of each dial and control button!
4. Experiment and Learn More Advance Functions
Now you have a basic understanding of how your mirrorless camera works. You should know by now what are the main controls or dials that you will be using more frequently.
In the User’s Manual, there should be sections for “Basic Guide” and “Advance Guide”.
- Basic Guide
- Teaches you how to set up your camera (already done in topic 2)
- Teaches you how to make a test shot (already done in topic 3)
- Advance Guide
- It focuses on more detailed topics.
- It will take you through more complex subjects like proper exposure, the correct way of using the Shutter button, etc.
- You will be frequently coming back to this part of the manual, so you must keep your copy always accessible.
BASIC CAMERA SETTINGS
1. Three Shooting Modes (Recommended)
Functions control or dial have plenty of shooting modes to choose from, however, as a beginner, you will not be utilizing all of them.
Three shooting modes are frequently used even by professionals.
They are marked on the dial as P, Av, and Tv (please note that I’m using Canon as an example, other brands use other inscriptions therefore check your manual).
- P mode
- Program mode – all settings are automatic.
- If you select this shooting style, all you need to do is press the shutter button and all the main elements for proper exposure (ISO, Shutter Speed, Aperture) are done automatically.
- This shooting mode is best suited and is always recommended for beginners.
- P mode also is a good option for night shooting and low light conditions.
- Av mode
- Aperture Priority mode – Aperture setting is controlled manually while leaving Shutter speed and ISO at auto.
- Aperture priority is best suited if you want to control DOF (Depth Of Field)
- Aperture controls how much of the subject is in focus.
- I always use aperture priority as my setting because I can control how sharp or how much blur I want to have with my image’s background.
- Tv mode
- Shutter Speed Priority mode – Shutter speed setting is controlled manually while leaving Aperture and ISO at auto.
- Shutter speed priority is best suited if you want to freeze a moving subject or want to create a motion blur of a moving subject. Shutter speed is responsible for how much time the light hits the image sensor.
- Fast shutter speed- freezes the moving subject.
- Slow shutter speed- will create motion blur of the moving subject.
2. Manual And Auto Focus
- Manual Focus
- Not suggested for beginners.
- Only use manual focus if you are shooting a static subject.
- Activate MF peaking function for an easier and better manual focusing result.
- Auto Focus
- Suggested setting for beginners.
- Always activate autofocus when shooting still images and videos.
- Select and set AF operation (ex. one-shot AF, Servo AF, etc).
- Note: If Servo AF is selected it can affect your battery life.
- Select and set what kind of focusing method you would want (ex. 1 point AF, Facial Tracking AF, etc).
- For other AF settings check your manual.
3. Shooting Drive Mode
- Single Shooting
- Single shooting means one capture per single click of the shutter button.
- This is a suggested or recommended setting to save storage space.
- Continuous Shooting
- Continuous shooting or Burst shooting means there will be several captured images per single click of the shutter button.
- Not suggested unless you have a large storage memory card and you want to choose what is the best capture.
4. ISO Sensitivity
- Recommended to always set at AUTO
- You can always select ISO manually if you want to experiment
5. White Balance
- Recommended to always set at AUTO.
- You can always change the setting by selecting different scenes.
- You can also customize if you want to experiment.
6. Image Quality (RAW or JPEG)
- RAW Image
- High-resolution image (uncompressed).
- Takes up a lot of storage space.
- Not recommended for beginners.
- RAW is only recommended if you are doing post-processing.
- JPEG Image
- Suggested image setting.
- Set JPEG’s image quality (ex. high resolution, mid-resolution, low resolution, etc).
- For better image quality (ex. for printing) select the highest resolution.
7. Video Recording Quality
- Select according to your desired setting (ex. Full-HD, HD, VGA, etc).
- Remember that when recording with higher resolution, it will consume bigger memory storage
8. Exposure Compensation
- Set to 0 (this is equivalent to auto).
- You can set exposure compensation manually by turning the dial.
- – value means your image will be darker.
- + value means your image will be brighter.
Tip: On Proper Exposure
Three elements are interrelated to achieve proper exposure. They are ISO, Aperture, and Shutter speed. All these three settings are connected and will affect the quality (exposure) of your image if not set properly. If you change one it will affect the two others. Therefore, take time to familiarize yourself and take note of the settings that you see that are good to use!
Tip: On Firing a Shot
- Press and hold the shutter button halfway, you will notice the AF frame marker will turn to green if the subject is in focus. Then fully press the shutter button to capture the image.
- You cannot fire a shot if the AF frame marker is red color.
- You can fire a shot when the AF frame marker is orange/gold color but you may get a blurred image.
5. Customize Your Favorite Settings
After experimenting and finding your desired settings you can customize them into your favorite settings for easy access.
Depending on your model you can have several favorites and commonly used configured settings saved for re-use!
You can always save your latest favorite settings to replace the old ones.
Final Thoughts
A Mirrorless camera is such an interesting piece of equipment to own and it enables you to explore the boundless facet of photography.
However, you need to use your mirrorless camera frequently to be able to enjoy it and read the manual as often as possible.
Until such a time when you see your own captured images and it amazes you then it will only remain as an ordinary digital camera that can take ordinary photos.
Enjoy shooting and experiment with different settings to improve your skills.
Expand your knowledge by checking online photography forums, it can help you enhance your understanding of how to use a mirrorless camera as well as photography in general.
You could even join photography groups and share your images to get some feedback so that you can work on how to improve your skills based on their suggestions.
That’s it, folks, if you find this article helpful or if you have any questions, please leave your comment below, and will try to answer them to the best of my knowledge!
About Rowe Medialdea:
Hi, I’m Rowe, a mirrorless camera and photography enthusiast. We have created this site to be of help (especially to beginners) by producing easy-to-understand content about mirrorless cameras! Welcome to our website!